What happens to my heating and air conditioning unit when it gets submerged in water?
When your home or building gets flooded by water from the weather or a pipe bursting, the last thing we might think about is the appliances. Water heaters, refrigerators, air conditioning or heat pump units, furnaces, boilers, stoves, ovens, or dishwashers. There may of not been enough time to shut down the electrical power to these systems, or the electrical panel became inaccessible. Whatever the reason, when your heating and air conditioning system is exposed to large amounts of water, several things need to be checked before it can be deemed safe for operation. There are three points that need to be determined before you can proceed with the steps to starting and operating the HVAC units again.

The first assessment of the situation is to determine how much water was the system exposed to? If the system was drenched or submerged in water, for any period of time, it needs to be determined how extensive the damage is to the units. This can only be decided after the water is removed and the system had a period to dry out. We will go over the needed steps to take in this article.
The second thing you need to take into consideration is if the unit had electrical current to it when it was exposed to the water. Even though the system may have been shutdown at the thermostat, it does not mean that the unit was not being supplied with high-voltage electric at the time it was taking on water. This question could only be resolved if you know for certain that the unit was disconnected at the time of exposure. This could only be determined if the unit was turned off at the electrical breaker/fuse panel or service switch (if installed) before it was exposed.
The third factor is, how long was the system exposed to water. Was it a few hours? Days? Weeks? This is an important question to answer and could determine if the system can or cannot be restored for operation.
Assessing the situation from the flooding. How much damage did it do?
In this article, we will take it from the best-case to the worst-case scenario. We start with the assumption that all the water has been removed and you are beginning the process of drying out the space that has been flooded. Before we begin, we must take the first step of determining if the electrical high-voltage power is shut off to the unit.
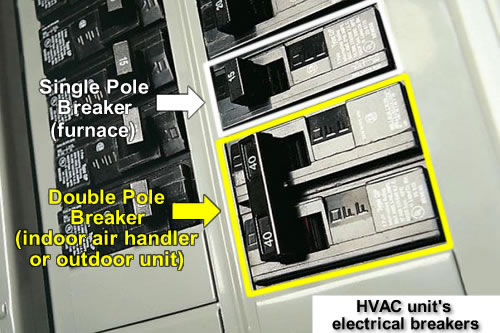
PRIORITY STEP #1: Make sure the power is off to the system by turning off the electrical circuit breaker and the service switch (if installed) at the indoor unit. Do not take further steps until the power has been completely shut off to the indoor unit! Your indoor unit can be an air handler (for an air conditioner or heat pump), or furnace (gas, oil, or electric). An air handler or electric furnace will have a double-pole circuit breaker (two connected switches), and an oil or gas-fired furnace will have a single-pole circuit breaker (one switch).
If you do not know if the power is turned off to the system, you can buy a non-contact voltage detector at any hardware or big-box store. They are inexpensive and it tells you if there is electrical current by touching the tip (looks like a pen) to the outside of a high-voltage electrical wire. You do not have to remove panels, access covers, or expose bare wires; just touch the tip of the detector to the main electrical wire going into the unit. It will blink, and some beep also, if electrical power is in the wire. They are a useful tool for detecting electricity at outlets, switches and wiring without removing covers or exposing connections. Read the instructions.
Tools you will need: medium flat-head screwdriver, small pliers (needle nose pliers are best), a good flashlight (LED lights are best), box fan, 1/4"-5/16" nut drivers or sockets, wet/dry vacuum, towels, leather or rubber gloves, protective eyeglasses/goggles, 1/8" drill bit and battery powered drill.
If the breaker is tripped, proceed directly to Scenario #2 - STEP 2A. If you can not find the circuit breaker- DO NOT PROCEED further until you know that electrical power is completely shut off to the heating or air conditioning system!
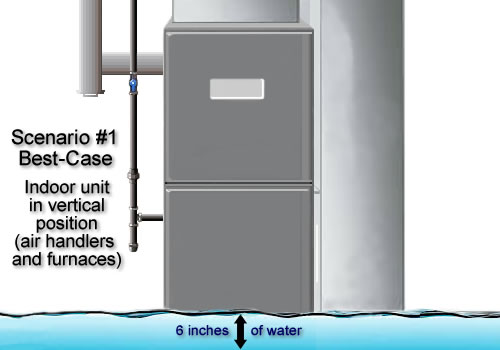
SCENARIO #1: Best-Case Situation
Unit in vertical position [ ↕ ]. Water has entered the bottom of the unit and is up to 6 inches deep.
STEP 1A: With power completely shut-off to the system, remove the panels from the front of the unit. You may need a screwdriver, nut driver, or socket (1/4" - 5/16") to remove the panels. Make sure all front panels are removed.
AIR HANDLERS (Heat Pumps & Air Conditioning Systems): The bottom section contains the evaporator (indoor) refrigerant coil. This coil can get wet. You can basically leave it alone. Any residual water will drain out through the connected plastic piping. An air handler usually sits on a "return box". Find an access through a filter housing, and with a flashlight, see if there is standing water in the bottom of the box. Residual water or moisture in the box will dry out by running the unit. If there is a lot of water in the box (1" or more), wearing protective eye wear and gloves, take a drill with a 1/8" drill bit and drill a hole in the bottom ridge of the box. Use a towel(s) to catch the water. This small hole will not cause performance problems, but to be sure of preventing dirt getting sucked into the system, put a piece of duct tape or putty over the hole when the inside of the box is dry.
FURNACES (Oil-fired & Gas-fired): In the bottom area , you will see the blower housing, blower motor, and in some units; a circuit board and capacitor. The blower housing and wheel are referred to as the "squirrel cage". If your furnace sits on a box, take a flashlight and check if water is in the bottom of the box. This is the easiest incident to remedy because all you have to do is take a wet/dry vacuum (Shop Vac® type) and remove the water from the box. If the unit sits on the floor even on pads/bricks and water entered the unit, you will need to dry out the connected ducting and insulation in this area before you can start the system.
This scenario outlines that the water did not get to electrical components. Yes, the water may have risen up to the components, but did not submerge them. In the bottom area, you should be able to feel the insulation on the sides and see how high the water rose inside the unit.
STEP 1B: Remove all filters from the system. If you have and an electronic air cleaner, remove the cells and screens (pre-filters). Examine the filters for moisture. If they are non-washable, disposable air filters, they need to be replaced. A washable media (electrostatic or nylon) can be dried. The parts in an electronic air cleaner can be dried also. Replace all new or dried filters in last before the system is ready to be started.
Note: Disposable filters, even new ones, that have gotten wet have to be discarded. When the fiberglass and cardboard material gets wet, it tends to breakdown. This will flake off when dry causing it to get caught in the blower assembly or indoor refrigerant coil.
STEP 1C: Take a wet/dry vacuum and remove as much water that you can from the bottom of the unit and the insulation on the sides. If there is metal ducting or a filter housing connected to the unit, check to make sure there is no standing water in the ducting or housing. Take a towel and clean up any remaining moisture. Use gloves! There are sharp edges everywhere. If the insulation on the sides of the unit is soaked, take a box fan and place it in front of the bottom area that has been exposed and face it blowing out and away from the unit. When the insulation and area are dry, you can replace the panels and filters; turn on the electrical power, and start the system.
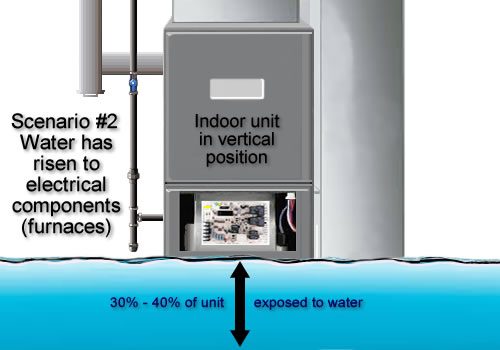
SCENARIO #2: Water has risen to electrical components.
Unit in vertical position [ ↕ ]. Water has entered the bottom of the unit and immersed electrical components (motor, circuit board, capacitor). Water has reached 30% - 40% of indoor unit.
STEP 2A: If the electrical components were exposed to water and the system had electric current, it most likely will:
A. Burn out the control board.
B. Trip the breaker to the unit, or both A and B.
When you performed the PRIORITY STEP #1 (above) and shut off the electric power, if the circuit breaker was tripped; this is a sign that the electrical components were exposed to water.
STEP 2B: Follow Steps 1A and 1B (above). Take a flashlight and inspect the components that were exposed to the water. Look for burnt wires or areas on the circuit board (if supplied on type of unit). If you do not have a circuit board that was exposed to water, proceed to STEP 2C. If there are burnt marks on wires connected to the circuit board or on the board itself, it will have to be replaced. There is a removable fuse on the circuit board. If it is the plastic type, remove it with a pair of pliers. If it a glass tube type, do not remove; first examine it and see if the fuse is burnt or blown. Holding a flashlight next to it while it is still on the board, you will see a fine wire and no black marks in or on the fuse or the connections if it is good. If you have to remove the fuse, wear eye protectors and gently pry out the fuse. The best way is to use an automotive fuse puller. If the glass breaks, remove all pieces with a pair of pliers. The ampere (amp) rating is on the fuse and most automotive stores will have them.
STEP 2C: Put your gloves on. On the opposite side of the motor that is attached to the 'squirrel cage' is an opening. With a gloved hand, spin the wheel inside the blower housing. Always use gloves! The inside of the housing and wheel is sharp! Do you hear moving water, when you spin it in both directions? If you do, proceed to STEP 2D. If not, proceed back to STEP 1C.

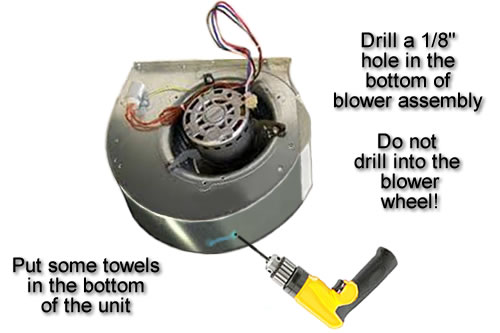
STEP 2D: If you hear water sloshing in the housing, you need to extract the water. Place towels below the housing. Wearing protective eye wear and gloves, use a drill with a 1/8" drill bit and carefully drill a small hole in and as close to the bottom of the metal blower housing as you can. Do not poke the drill bit completely through the housing. Drill until you see water coming from the hole, then stop. Once all the water is drained, remove the towels. Remember, there could be metal shavings from when you drilled in the towel. This small hole will not hurt the performance of the system, but you can put a piece of duct tape or putty to cover the hole once the inside of the housing is dry. This area is "downstream" from the filter so there is no harm of dirt getting into the system. Proceed back to STEP 1C.
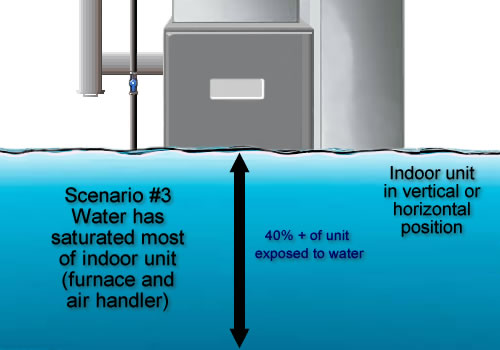
SCENARIO #3: Water has saturated most of indoor unit.
SCENARIO #3 WORST-CASE: Unit in vertical [ ↕ ] or horizontal position [ ↔ ]. Water has entered 40% + of the unit.
The only thing we would recommend is to shut off the power to the system and open all the panels to the unit. If the breaker did not trip, and the unit did not run while it was submerged, you may have a chance of it working by letting it completely dry out. This may take awhile depending on how long the system was exposed to water. You can speed up the process by vacuuming and soaking up standing water and using a box fan blowing away from the unit. Piping that contains natural or liquefied-propane gas, or fuel oil, should be throughly inspected for corrosion and leaks. Rusted or corroded piping should not be used and professionally replaced. The fuel line should be shut off to the unit. If after the system is completely dried out, and all of its components are not corroded, you can try to start it. If it doesn't start on the first try, or blows the circuit breaker, our professional suggestion is to contact an HVAC service company to remedy the situation before further damage is done to the system.
Note: It needs to be noted that though a system might run normally after being subjected to water and moisture; it does not mean that electrical components will not fail prematurely after being exposed to water for a long period of time.


